Mushroom cultivation is both an art and a science, requiring patience and knowledge of fungal biology. One of the most essential techniques in this field is cloning, a method that allows cultivators to propagate superior genetic strains efficiently.
This article provides a comprehensive guide to mushroom cloning, its benefits, and the techniques involved.
What is Mushroom Cloning?
Mushroom cloning is the process of extracting tissue from a living mushroom fruit body and transferring it to a sterile growing medium to cultivate identical offspring. In simple terms, mushroom cloning is a technique used to create genetically identical copies of a desired mushroom. This method preserves the genetic traits of the parent mushroom, ensuring consistency in growth and yield.
Why Clone Mushrooms?
Mushroom cloning offers several important benefits for cultivators. When you clone mushrooms, you’re essentially preserving superior genetics from specimens that show qualities you want to keep. Unlike growing from spores, which creates varied offspring with different traits, cloning ensures the mushroom’s desirable characteristics—such as impressive size, abundant yield, and strong resilience—remain exactly the same across new generations.
The cloning process significantly speeds up the growing cycle as well. By skipping the spore germination stage, cultivators save considerable time—typically one to two weeks—allowing for more efficient production cycles and quicker harvests.
Cloning is also remarkably accessible and budget-friendly. Growers can take tissue samples from mushrooms they’ve already grown, found in the wild, or even purchased from grocery stores. This self-sufficiency reduces or eliminates the ongoing expense of buying new spores, making mushroom cultivation more sustainable and economical over time.
This process is valuable for cultivators who want to:
- Maintain desirable traits: This could include consistent potency, size, growth speed, or unique visual characteristics.
- Ensure consistent yields: Cloning allows for the production of predictable harvests.
- Preserve rare or valuable strains: It helps to safeguard genetic lineages.
Here are specific examples of desirable traits that can be preserved through cloning:
Resistance to Contaminants
Some mushrooms develop a natural resistance to common contaminants like Trichoderma (green mold) and bacterial blotch. By cloning a specimen that has successfully fought off contamination in a grow, cultivators can improve the overall resilience of their culture.
Faster Fruiting Times
Some strains of B+ and Golden Teacher have been selectively cloned for rapid colonization, reducing the time between inoculation and harvest. For example, a fast-fruiting B+ mushroom may produce a full flush in as little as 10–14 days after pinning.
Larger and Denser Fruit Bodies
Penis Envy variants are often cloned for their thick, dense stems and high potency, while Tidal Wave (B+ x Penis Envy) is known for its wavy caps and meaty texture. Cloning can ensure these robust traits persist in future generations.
Unique Aesthetic Qualities
Albino or leucistic mutations, such as Leucistic Golden Teacher (LGT) or Albino B+, can be maintained through cloning. These mushrooms retain the same genetic background as their parent strain but exhibit striking white or pale coloring.
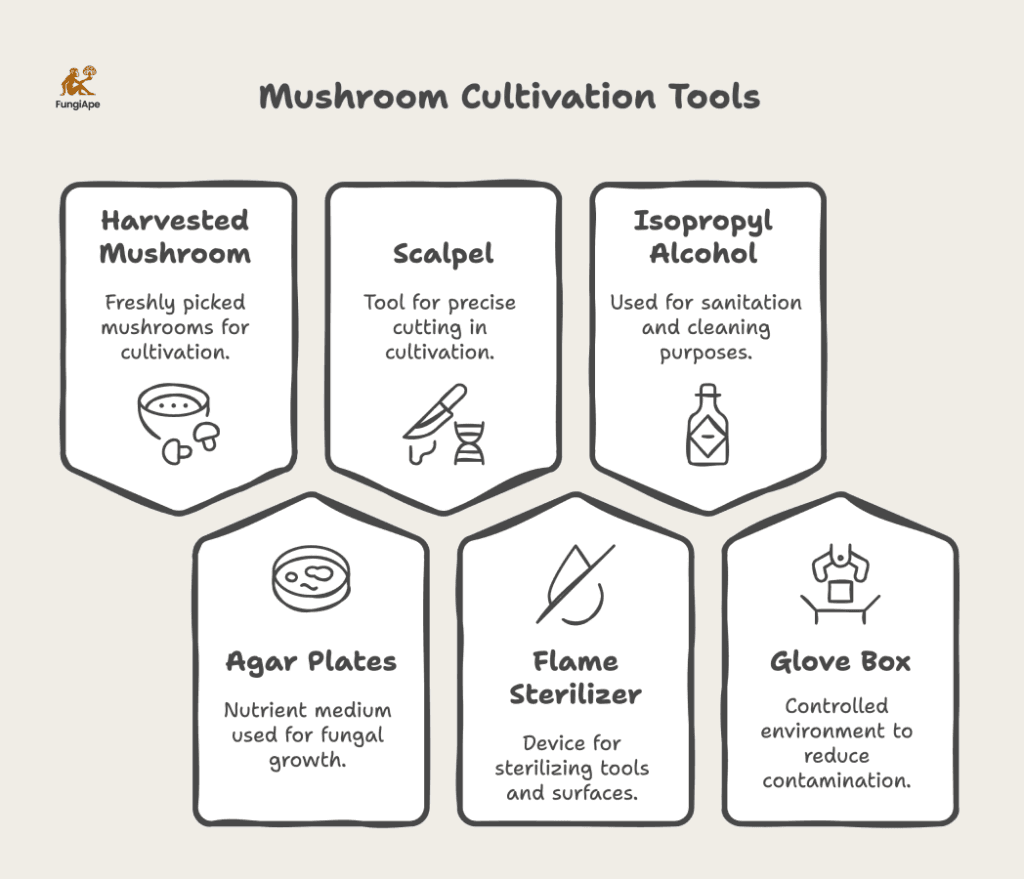
Materials Needed for Mushroom Cloning
To perform mushroom cloning, you will need:
- Freshly harvested mushroom
- Agar plates (nutrient medium for fungal growth)
- Scalpel or sterile blade
- Flame sterilizer (e.g., alcohol lamp)
- Isopropyl alcohol for sanitation
- Glove box or still air box (to minimize contamination)
Successful mushroom cloning requires proper equipment and materials to maintain sterility and promote healthy mycelial growth. Beyond the basics, understanding the specific options and techniques for each tool can significantly improve your cloning success rate.
For your growing medium, several types of agar offer different benefits depending on your chosen mushroom species. Potato Dextrose Agar (PDA) provides excellent nutrition and works well for most cultivated species including oysters and shiitake. Malt Extract Agar (MEA) creates an ideal environment for wood-loving species, while Sabouraud Dextrose Agar offers superior performance for more challenging species. Many growers also add antibiotics or food coloring to their agar to help identify contamination early.
When selecting cutting tools, precision and sterility are paramount. Medical-grade #10 or #11 scalpels with stainless steel handles allow for accurate tissue extraction and can be repeatedly sterilized. Alternatively, disposable surgical blades mounted on a blade holder provide a fresh, sterile edge for each procedure. Some cultivators prefer fine-tipped tweezers as a complementary tool for handling small tissue samples.
Flame sterilization requires a reliable heat source. Small alcohol lamps filled with 70% isopropyl alcohol provide a consistent flame and minimal soot. Butane lighters work in a pinch but may leave residue on your tools. Proper technique involves heating the blade until it glows red-hot (approximately 3-5 seconds), then allowing it to cool for 5-10 seconds before use—long enough to kill contaminants but not so long that it becomes recontaminated.
A still air box (SAB) or glove box creates a protected workspace essential for contamination-free cloning. Construct a simple SAB using a clear plastic storage container (minimum 56 quarts) with two 4-5 inch arm holes cut into one side. Sand the edges smooth and ensure the container has a tight-fitting lid. More advanced setups might include built-in gloves or HEPA filtration systems.
For sealing your plates after transferring tissue samples, parafilm provides the gold standard for laboratory-grade protection while still allowing gas exchange. Micropore tape (3M paper medical tape) offers a more affordable alternative with similar benefits. Some growers use plastic wrap in a pinch, though it’s less ideal for long-term storage.
Additional useful items include 70% isopropyl alcohol in a spray bottle for surface disinfection, nitrile gloves for hand protection, a clean lab coat or designated clothing, and a notebook for recording dates, species, and observations of each cloning attempt.
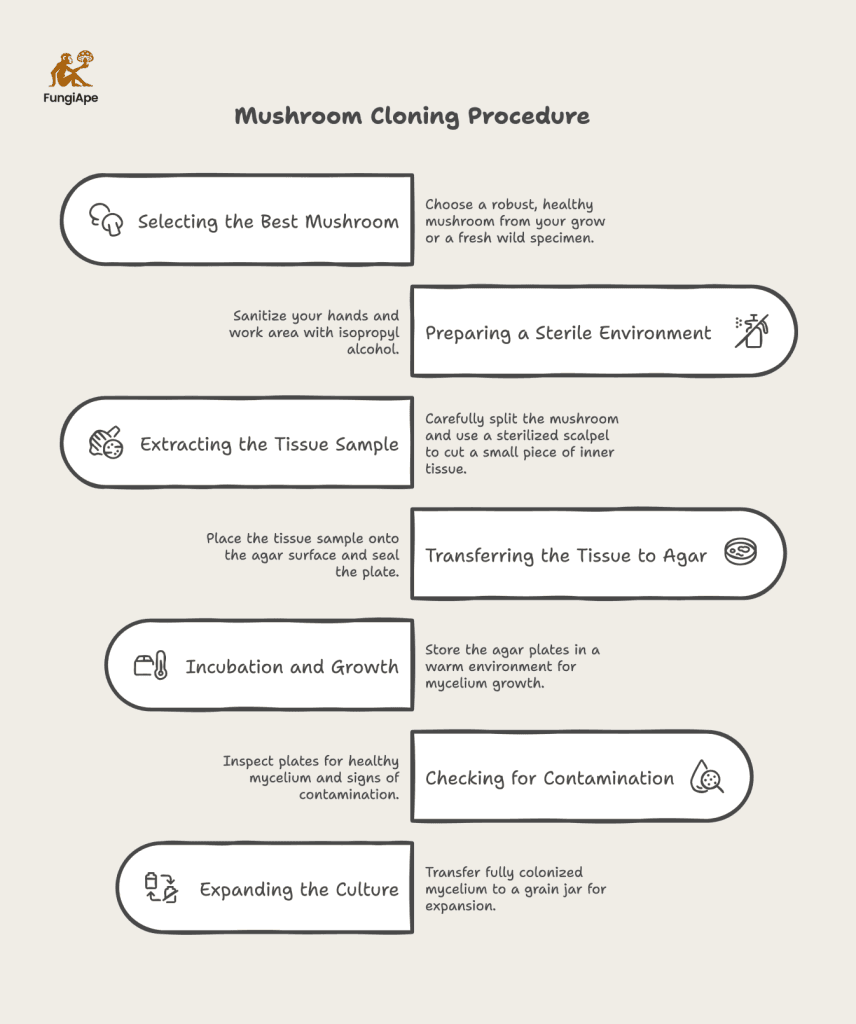
Step-by-Step Cloning Procedure
Step 1: Selecting the Best Mushroom
Choose a robust, healthy mushroom from your grow or a fresh wild specimen. The best candidates are large, vigorous mushrooms that exhibit strong growth characteristics.
Step 2: Preparing a Sterile Environment
Sanitize your hands and work area with isopropyl alcohol. Ensure that all tools, including your scalpel and agar plates, are ready in a sterile environment to prevent contamination.
Step 3: Extracting the Tissue Sample
- Carefully split the mushroom in half with your hands to expose the uncontaminated inner tissue.
- Flame sterilize the scalpel until red hot, then let it cool.
- Use the sterilized scalpel to cut a small piece of inner tissue, avoiding any areas exposed to the air.
Why Internal tissue? By taking internal tissue, cultivators greatly reduce the risk of contamination from outside bacteria and other organisms that may be present on the outside of the fruiting body of the mushroom.
Step 4: Transferring the Tissue to Agar
- Open the agar plate lid slightly, minimizing exposure to open air.
- Place the tissue sample onto the agar surface in the center of the plate.
- Close and seal the agar plate to prevent contamination.
Step 5: Incubation and Growth
Store the agar plates in a dark, warm environment (~75°F or 24°C). Over the next one to two weeks, mycelium should start to grow from the tissue sample, colonizing the plate.
Step 6: Checking for Contamination
Inspect the plates for contamination, such as unwanted bacterial or mold growth. Healthy mycelium appears white and fluffy, while contamination may show green, black, or yellow spots.
Step 7: Expanding the Culture
Once mycelium fully colonizes the agar plate without contamination, transfer it to a grain jar for further expansion before spawning it to bulk substrate.
Common Mistakes and How to Avoid Them
1. Using Dehydrated Mushrooms
Mycelium in dried mushrooms is no longer viable. Always use freshly harvested mushrooms for cloning.
2. Poor Sterilization
A large aspect of successfully cloning mushrooms depends on maintaining sterile conditions. This helps ensure that the desired mycelium can grow free from contamination. Contamination is a major issue in mycology. Always flame sterilize tools before use and work in a clean, still air environment.
3. Cutting Instead of Splitting the Mushroom
Using a scalpel to cut into the mushroom may drag contaminants inside. Instead, split the mushroom by hand and extract tissue from the inner part.
Conclusion
Mushroom cloning is a valuable technique for cultivators looking to replicate high-quality genetics efficiently. By following a sterile and methodical approach, growers can ensure successful propagation and maximize yields. Whether for home cultivation or commercial production, mastering cloning techniques will significantly enhance mushroom-growing endeavors.
Legal Disclaimer: The cultivation of certain mushroom species, including Psilocybe cubensis, is regulated or prohibited in many regions. Always research and comply with local laws before attempting cultivation. This article is for informational purposes only and does not promote or encourage illegal activities.
Read more:

Yeti
4.9/5 (189 Reviews)
Treasure Coast Albino
4.9/5 (189 Reviews)
Tatandi Leucistic
4.9/5 (189 Reviews)
Sebu
4.9/5 (189 Reviews)
Red Boy
4.9/5 (189 Reviews)
Panaeolus Cyanescens Copelandia
4.9/5 (189 Reviews)
Moby Dick
4.9/5 (189 Reviews)
Mexicana
4.9/5 (189 Reviews)
Melmac Thrasher
4.9/5 (189 Reviews)
McKennai
4.9/5 (189 Reviews)